|
|
|
W e l c o m e T o S c
i e n c e L i n k s S i t e s)_9 |
A world-wide-web site which comprehends
spirituality in a modern context in review of ancient teachings
and religious belief-systems.W e l c o m e T o S c i e n c e L i n k s S i t e s)_9
Interaction Of The Universe To The Individual
P R O M O T I N G C O N S C I O U S N E S S O N T H E I N T E R N E T


HYDROPONIC NATIONAL DEFENCE BUSINESS PERPETUAL SOLAR POWER FAVORITES LINKS
SAMPLE PHASE-1
Table of Contents
Introduction
Plant RequirementsTypes of Systems
- Growth Requirements
- Nutrient Solution
Summary
- Water Culture Systems
- Aggregate Systems
Nutrient Deficiencie
Hydroponics is often defined as "the cultivation of plants in water." Research has since determined that many different aggregates or media will support plant growth; therefore, the definition of hydroponics has been broadened to read "the cultivation of plants without soil."Growers all over the world are using hydroponic techniques due to the lack of a large water supply or fertile farmland. Home gardeners have used hydroponics on a smaller scale to grow fresh vegetables year round and to grow plants in smaller spaces, such as an apartment or balcony. Greenhouses and nurseries grow their plants in a soilless, peat- or bark-based growing mix. The nutrients then are applied to the growing mix through the water supply. Therefore, this is also a type of hydroponics.
Soilless gardening offers many advantages to the home gardener. Since a sterile medium is used, there are no weeds to remove, and soil-borne pests and diseases are minimized, if not eliminated completely. Properly grown hydroponic plants also are healthier and more vigorous because all of the necessary growth elements are readily available. The plants can mature faster, yielding an earlier harvest of vegetable and flower crops. Hydroponic gardens use less space since the roots do not have to spread out in search of food and water. This small space requirement makes hydroponics ideal for home gardeners, and it makes better use of greenhouse space. The big advantage to hydroponics is the ability to automate the entire system with a timer. Automation reduces the actual time it takes to maintain plant growth requirements. Automation also provides flexibility to the gardener as one can be gone for long periods of time without having to worry about watering the plants.
Hydroponics offers many advantages for commercial agriculture. Cultivating plants without soil eliminates the need for vast farmland and allows crops to be produced in greenhouses or even in the desert sands. Hydroponic techniques also allow for precise water and nutrient application directly to the roots of each plant. Water is reused in these systems and less is lost through evaporation and run-off. Therefore, arid lands, such as deserts, can be transformed into productive lands using limited amounts of water. Growing plants hydroponically is not difficult if one understands the basic principles. As long as plant growth requirements are met, there are numerous hydroponic systems that can be used.
Whether a plant is grown in soil or a soilless medium, there are many factors affecting plant growth and productivity. All plants require nutrients, water, light, and air to grow. A plant grown in soil obtains nutrients and water from the soil, when available. With hydroponics, because water and nutrients are always available, the plant is never stressed. Sunlight and air are readily available in an outdoor hydroponic system. However, for an indoor system, one must provide an adequate light source and good air circulation. Metal halide lamps, sodium vapor lamps, gro-lights, or fluorescent lights used in conjunction with incandescent light bulbs provide adequate light. Plant roots must have oxygen available to keep them alive. Healthy roots (which are white in color) are responsible for the uptake of all nutrients for the plant. If the roots die, it is impossible for the plant to survive, even if the plant growth requirements are met. Air circulation around leaves is important since it mixes the air and allows the plant to draw out the carbon dioxide necessary to carry on photosynthesis. Air circulation also helps prevent fungal diseases caused by moist, stagnant conditions. Indoor units often have a small fan to circulate the surrounding air.
The nutrient solution is the most important factor in the success or failure of a hydroponic system. Most fertilizers commonly available in garden centers do not contain all of the 13 elements necessary for plant growth because the growing media usually provides many of them. Hydroponic plants receive nutrients from a different source; so it is necessary to use a fertilizer formulated for hydroponic systems. Hydroponic fertilizers are available from many mail order companies and a few specialty garden centers. It is important to follow the dilution rate recommended on the label and to test the solution to be sure that the pH is between 5 and 6. Simple pH test kits and pH modifiers are available wherever fish supplies are sold.Depending on the stage of plant development, some elements in the nutrient solution will be depleted more quickly than others. Because of this, it is important to change the nutrient solution every two weeks. The old solution can be used to water other houseplants or outdoor plants. Also, make sure that the nutrient solution is kept at the original volume. As water evaporates from the nutrient solution, the fertilizer becomes more concentrated and can burn plant roots. Add water only and not more fertilizer to raise the nutrient solution back to its original volume.
The nutrient film technique 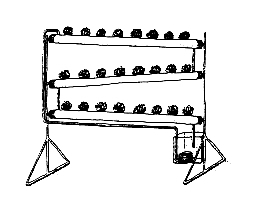 (Figure
1) uses a plastic trough or tube as the container through which a
constant, thin film of nutrient solution flows. Plants are suspended through
holes in the top of the trough. The trough is gently sloped so gravity pulls the
solution back to the nutrient reservoir. There are many variations of this
system, making it the most popular for the home gardener.
(Figure
1) uses a plastic trough or tube as the container through which a
constant, thin film of nutrient solution flows. Plants are suspended through
holes in the top of the trough. The trough is gently sloped so gravity pulls the
solution back to the nutrient reservoir. There are many variations of this
system, making it the most popular for the home gardener.
Aeroponics 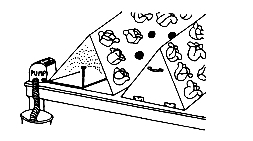 (Figure 2) is the growing of plants in a container in which
the roots are suspended in a nutrient mist rather than in a solution. The most
popular container for aeroponics is an enclosed A-frame constructed of styrofoam
boards. The plants are placed in holes along the sloped sides of the frame. The
nutrient mist is delivered to the roots by a vaporizer or by special attachments
available with drip irrigation kits. The mist clings to the roots. Any excess
runs down the inside of the frame, is collected at the bottom, and is recycled
back to the nutrient reservoir.
(Figure 2) is the growing of plants in a container in which
the roots are suspended in a nutrient mist rather than in a solution. The most
popular container for aeroponics is an enclosed A-frame constructed of styrofoam
boards. The plants are placed in holes along the sloped sides of the frame. The
nutrient mist is delivered to the roots by a vaporizer or by special attachments
available with drip irrigation kits. The mist clings to the roots. Any excess
runs down the inside of the frame, is collected at the bottom, and is recycled
back to the nutrient reservoir.
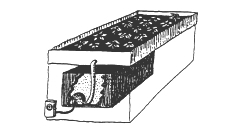
The aeration method 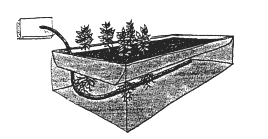 (Figure 3), one of the first systems to be developed, uses
an aquarium air pump to bubble oxygen to the roots of plants immersed in the
nutrient solution. Plants are suspended 1 inch above the solution by a
2-inch-deep mesh tray that is set into the container by placing the lip of the
tray over the container's edge. A layer of inert material, such as gravel, clay
pebbles, or vermiculite, is placed in the tray to provide stability for the
plants while allowing the roots to grow down into the nutrient solution.
(Figure 3), one of the first systems to be developed, uses
an aquarium air pump to bubble oxygen to the roots of plants immersed in the
nutrient solution. Plants are suspended 1 inch above the solution by a
2-inch-deep mesh tray that is set into the container by placing the lip of the
tray over the container's edge. A layer of inert material, such as gravel, clay
pebbles, or vermiculite, is placed in the tray to provide stability for the
plants while allowing the roots to grow down into the nutrient solution.
 (Figure 4). A water-holding container, such as a
plastic dish pan, is filled with the aggregate and plants. The container is
flooded periodically with the nutrient solution. The solution is drained back
into the nutrient reservoir by opening a valve at the bottom of the container.
During each cycle, the roots should be submerged in the solution for no more
than 20 to 30 minutes.
(Figure 4). A water-holding container, such as a
plastic dish pan, is filled with the aggregate and plants. The container is
flooded periodically with the nutrient solution. The solution is drained back
into the nutrient reservoir by opening a valve at the bottom of the container.
During each cycle, the roots should be submerged in the solution for no more
than 20 to 30 minutes.
Another common aggregate system is the trickle feed method 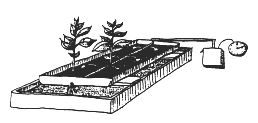 (Figure 5). The nutrient solution is continuously
pumped from the reservoir through a 1/2-inch irrigation tube that branches into
a number of 1/8-inch tubes. These smaller tubes deliver the solution to the
containers. Any excess solution is collected at the base of each container and
returned to the nutrient reservoir.
(Figure 5). The nutrient solution is continuously
pumped from the reservoir through a 1/2-inch irrigation tube that branches into
a number of 1/8-inch tubes. These smaller tubes deliver the solution to the
containers. Any excess solution is collected at the base of each container and
returned to the nutrient reservoir.
A modification of the trickle feed method is called tube culture 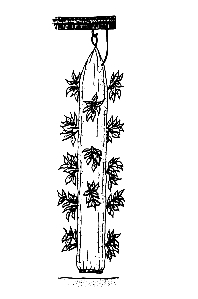 (Figure 6). A 4- to 6-inch plastic tube or bag is
filled with a lightweight aggregate. Holes are made on all sides of the
container for the plants. The tube is hung vertically, and an irrigation tube is
positioned at the top of the container. The nutrient solution seeps through the
container and may or may not be recycled when it reaches the bottom.
(Figure 6). A 4- to 6-inch plastic tube or bag is
filled with a lightweight aggregate. Holes are made on all sides of the
container for the plants. The tube is hung vertically, and an irrigation tube is
positioned at the top of the container. The nutrient solution seeps through the
container and may or may not be recycled when it reaches the bottom.
Several developments in the past few years have made hydroponic gardening easier for the home gardener. Newer systems are simpler to set up and operate. An increase in suppliers of hydroponic products means equipment and special fertilizers are more easily obtained by the home gardener. The use of lightweight plastics in the newer systems makes hydroponics less expensive and a better investment than older systems that used heavy, concrete benches.Hydroponic systems are available in a variety of sizes and prices. Kits are available from many suppliers, and some hydroponic systems can be built easily at home from materials found at hardware stores and fish supply stores. Numerous hydroponic and soilless gardening books can be found in local libraries and bookstores. Information also is available through the Hydroponic Society of America, P.O. Box 6067, Concord, CA 94524, (415)682-4193.
Occasionally, the nutrients in a hydroponic system are used up faster than they can be replaced, and the plants will show a nutrient deficiency. A quick fix for most of the deficiencies is to spray the leaves with an all-purpose, foliar fertilizer, although this will not completely solve the problem. The best remedy is to change the nutrient solution every week instead of every two weeks. In some cases, it may be necessary to switch to a different type of hydroponic fertilizer, if the same deficiencies persist. There are several books on hydroponics that give other remedies for a nutrient deficiency problem.
Hydroponic growing , complete details on how to set up your own hydro grow system without spending BIG bucks, by using recycled and generic building or gardening materials. I have grown many plants this year using the drip feed setup, this is a proven method that can be setup as you salvage your materials. With I money saved by growing my own, I improved my set up, got out of hock and I never have to see one of those rip off dealer scum bags again. Feel free to use my information for personal use all text and diagrams are owned and copyrighted.
Hydroponic Basics How hydroponics works principles and methods
Germinating & Sprouts How to germinate seed, when to plant and transplant.
Root Chamber Details on making your own Root Chamber
Rock wool Cutting and preparing Rock wool before use
Flood & Drain Flood & drain hydroponic setup
Drip Feed Drip Feed hydroponic setup
Pump Pump used to circulate juice
Indoors Lighting Fluorescent Light works well to start with.
Growing In Limited space Growing on shelves to make the most of your space.
Closet Growing Closet Growing.
Hydro Juice Hydroponic nutrient solution.
SEX Males from Females how can you tell
BASIC PRINCIPALS; Plant foliage requires light, oxygen and carbon dioxide. Plant root systems require water, nutrients and oxygen. When plants are grown normally water leeches nutrients from the soil and carries them to the roots. The water and nutrients are taken up by the roots to feed plant growth. Soil drainage then allows water to be replaced by air in the gaps between soil grains. This supplies the roots with oxygen.In hydroponics the nutrients are dissolved in the water. Soil is replaced with a growing medium to supply the roots with water, nutrients and oxygen. Hydro juice (nutrient solution) can be drip fed to each plant, it can also be used to regularly flood the root chamber, then drain out. Both methods require a pump and timer to circulate the nutrients through the roots and are covered by these diagrams and notes. Roots can also be grown in the air by spraying roots with a fine mist of hydro juice, or grown in the hydro juice and the solution aerated under each root mass with an air pump. With both of the second two methods the plants must secured at the base of the stem or something.
The hydroponic system described does work and is suitable for any plant with stringy roots. I have not tried it with any bulb plants or plants such as orchids that require fungus or mold in the soil to grow. This method is similar to Nutrient Film Technique (NFT) the thin Rockwool slice acting as a capillary mat. This eliminates the need to have flat bottom the root chamber and to level the bottom of root chamber, making easier and cheaper to set up.
This method will get the most vigorous growth if each plant has it's own continuos drip feed. The dripper is positioned drip on roots growing from the base of the seedling block, the roots will grow thick, hairy and compact under the dripper. 4L per hour dripper are used however their drip rate depends pressure, this is effected by height and size of the drip feed tank. The drip rate will slow as the tank empties.
Feeding can also be achieved with faster dripper at the top of each top end of each side of the root chamber. The plants grown like this had a large root mass, the roots of three plant taking up about a third of the root chamber. With the timer I had could only flood the root chamber every 4 hours, the growth rate was similar to the last. The growth rate will improve by flooding every hour or even less. After the root chamber is flooded it should drain to a trickle in a few minutes.
Germinating and Transplanting
STARTING PLANTS; Soak seeds in damp paper or cotton wool, cover seed with damp paper or cloth, drian off excess water and don't allow to dry out. When the seed root is 2 - 5mm. long place the seed root first in the small hole with tweezers (fig.3). Make sure the root is protected by the open jaws of the tweezers and that the seed or root isn't squashed. Then place seedling block hole up on a plate and wet Rockwool until it won't take any more water. Keep the plate on an angle for drainage, but the seedling blocks shouldn't dry out too much and seedling should come up in a few days. Seedlings can stay on the plate until roots grow from the bottom or sides of the seedling block (fig.4).When this happens seedling are ready to transplanted on to the Rockwool mat in the root chamber. (Before the seedling blocks go into the root chamber the rookwool is soaked in water 24 hours then with hydro juice at half strength.) Roots will grow from seedling block, through and along the under side of the Rockwool mats. Place three to eight plants per side, evenly spaced along the slot, and it will soon grow into mass of green. When the system is operational and plants are growing, the inside of the root chamber should have a rich earthy smell. Three or four plants if your growing them big (outdoors ), eight if your growing fast and flowering early ( under lights ).
When the roots grow from the bottem or sides of the Rockwool block it's ready to transplant into the grow tube. Once the roots have grown into the mat tou can hit them with full stength hydro juice. Light proof plastic should be used to cover the top of the root chamber white side up, this is to stop green slime growing on the rockwool. This can only be done when the plant is tall enough, take care not strain or damage the plant.
ROOT CHAMBER ROOT CHAMBER; The Root Chamber is made from 90mm. PVC storm water pipe. This type is used for all new building constructions so off cut are about. A selection of 90mm. PVC storm water pipe and 90mm. fittings are available at large hardware stores. Fittings include right angles, tee junctions, end caps and others. These can be used to make the root camber suit any room.
The root camber show in Diagrams (fig.5,6,7) is made with two lengths about 1 miter for the sides, 2 lengths about of 600mm. for the ends and 4 right angles for the corners. PVC pipe glue is used to make all joins water tight.
A slot is cut in the top of each side providing access to change growing medium and remove root mass. Holes instead of a slot may be used for each plant but another way of access must be used. A drain hole or holes are drilled in the bottom of one end of the root chamber and a flood hole is drilled in the top of the other end. The root chamber is mounted on an angle with drain end below then the flood end. This is to ensure that the roots don't get water logged. Too much of an angle will cause the Rockwell and roots to dry out at the high end.
GROWING MEDIUM; There are many growing mediums for hydro use. They include Rockwool, Vermiculite, Sand, Gravel, Expanded clay and others. Rockwool is used because it stays together and doesn't pollute the hydro juice.
One Rockwool block ( About $A12 - $A30 ) will last for several crops of 6 plants. The Rockwool block is sealed in plastic and is about 700mm. x 300mm. x 100 mm. Before cutting the mats you need to see the grain of the rockwool the grain of in fig8. is from side to side. Cut across the grain with sharp knife several slices ( Mats ) 7mm. to 10mm. thick off the long side(fig.8).
Each Rockwool mat is about 700mm. x 80mm. x 10mm. The Rockwool mats are passed through the slots and molded to the inside of the PVC pipe. This should cover the bottom inside half of each side of the root chamber with 7-10mm. of Rockwool mat. Be sure the Rockwool mat extends 50 - 100mm. longer than the slot. Next cut seedling blocks about 50mm. x 50mm. x 50mm.. Then poke a hole about 3mm. diameter from the middle of one side to the center of the block(fig.3). This hole should be large enough to let the seedling freely grow out the top of the seedling block. Make one block for each plant. These small blocks are used to germinate the seedling and support the growing plants.
The Rockwool should be prepared before using by soaking in water for 24 hours and then soak with fresh water for seeds or sprouts and in the root chamber with half strength hydro juice before the seedlings are transplanted.
FLOOD AND DRAIN; (Diagram-3)A flood and drain system requires a timer, a pump and a drain tank to catch the hydro juice. Hose is run from the bottom of the drain tank to the pump inlet. Hose is run from pump outlet to the hole in the top of the flood (high) end of the root chamber. The pump inlet is below the bottom the drain tank. As the drain tank is filling hydro juice flows through to the pump inlet through the pump and up the flood hose till level with the hydro juice in the tank. This is to prime the pump as the pump can't suck air, it can only push out what flows in the inlet. The timer runs the pump for 1 minute and the hydro juice fills about half the root chamber. If chamber over flows increase size of drain holes. If a hose is used at the drain end, it must not cause hydro juice to stand at the drain end. A recycling type bin is ideal for the drain tank (see end of Drip Feed section to attach hose to drain tank). Putting the pump on the floor andthe drain tank on bricks should raise it enough prime the pump.
This feed system has a dripper for each plant. Dripping the hydro juice directly on the top of the root mass should stop the plant from sending out long roots in search of food. Resulting in more growth on top or so the theory goes. The drip system uses a drip feed tank about one metre above the drippers and reticulation system.
Reticulation(diagram-4.1) is via 13mm. poly tube to just above the root chamber. A hole is punched in the 13mm. tube. A 4mm. adapter is screwed into the hole. Then 4mm. poly tube is attached to the 4mm. adapter. A dripper is attached to the other end of the 4mm. tube. The 4mm poly tube should be kept as short as possible so there is enough pressure to start the drippers. Barbed right angles and tee's are used to route the 13mm. poly tube close to each plant. The top of the 13 mm. poly tube is about 50mm. below the bottom of the drip feed tank. A 13mm. to snap-on adapter is fitted to the top of the 13mm. poly tube. If the 13 mm. poly tube is positioned at right angles to the slot and the 4mm. adapter, 4 mm. poly tube and the dripper positioned over the slot. Any leakage at the joins in the poly tube will drip into the slot preventing loss of hydro juice.

diagram-4.1
A 42 litre plastic garbage bin and lid is
used for the drip feed tank. Snap-on fittings and 13mm. garden hose connect the
bottom of the drip feed tank to the to 13mm. poly tube. They also connect the
pump outlet hose to the top of the drip feed tank. A Stop Snap-on is used where
the garden hose connects to the Snap-on adapter on the 13mm. poly tube. This
prevents the hydro juice flowing from when the Snap-on is removed from the 13mm.
poly tube.
To convert from flood and drain to drip feed. Move the pump
outlet hose from the flood inlet on top of the root chamber, to the top of the
drip feed tank.
Snap-on universal sprinkler adapter are used to connect hoses to the side of the drip feed tank . These are a Snap-on to 13mm. thread adapter. There is also a 20mm. thread that screws onto a 13mm. thread. A hole no larger than the 13mm. thread is drilled in the side of the tank. The 13mm. thread is pushed through the hole from the outside of the tank. Now the 20mm. thread is screwed on to the 13mm. thread inside the tank creating a water tight seal. Make sure the hole is away from obstructions inside the tank that would prevent the 20mm. thread from attaching to the 13mm. thread. This method is used for all tanks and also for the pump outlet hose connection to the top of the flood end of the root chamber.
After the hydro juice has drained out of the root chamber into the lower tank it has to be pumped back up again to recirculate. A timer switch is used to control the pump. Hydroponic and Aquarium suppliers sell pumps from about $A45 for a small one and about $A150+ for an adequate pump. Old washing machine drain pumps can be used to circulate the hydro juice and are easily salvaged.
A typical washing machine drain pump consists of a electric motor, a cooling fan on one end of motor shaft and a water impeller on the other end. The water impeller has 2 short tubes for connecting the hoses. The inlet is over the centre of the impeller and the outlet on the side at right angles to the motor shaft. Attach a 13mm. garden hose to the pump inlet and one to the pump outlet using hose clamps, adaptors, silicon sealer or whatever. Pump outlet has more pressure than inlet.
Some pumps are DANGEROUS as they have a short duty cycle these are usually from automatic washers and can only be used for 5 minutes then not used again for 1 hour. A short duty cycle pump may burn out or CATCH FIRE if left on for too long. Test your pump by pumping water for 5, 10, 20, 60 minutes, at the end of each test disconnect the power supply from the pump and CAREFULLY feel the temperature of motor winding coil. You should be able bear the temperature for some time, CAUTION a pump with a very short duty cycle may be very hot after 5 minutes and the power must be disconnected before touching the pump.
Growing under lights allows plants to be in light 24 hours a day, promoting vigorous growth. Some growers use 18 hours light and 6 hours dark. Many types of lights are available. Agro-type HPS and HMI lights are better for growing in doors and a single 400watt light is easier to handle ten 40watt fluoro lights. However they are expensive and require a control box to fire the globe($200 - $400 for a 400watt globe, reflector and control box.). Fluorescent lighting is also effective, Gro-lux and other Agro-type tubes are available but aren't as powerful. Fluorescent light fitting can be purchased second hand for about $5 - $15 for single a 36 watt fitting and $10A - $25 for a double 72 watt fitting. New fitting are about twice the maximum cost of second hand unit.
Only one double fitting can grow many plants until they about 2 weeks old. As they grow taller the light is too dim at the sides and bottom of plant, more tubes will be needed to light these parts of the plant. The light from fluoro's needs to be very close to the foliage about 10cm. max., heat may cause burning or curling of the leaves if there touching the tube. If there are 6 large plants they will need 10 or 12 of 36 watt fluorescent tubes.
I used Fluoro's on my first 2 indoor crops starting with 4 tubes then adding tubes every week or two, as this was all I could afford. this setup soon supplied us with plenty of smoke and a quality that made buy on the street pointless. Before this I always been broke or in hock, paying for smoke and after while growing and not buying a could afford to get a 400watt HPS fitting and Son Agro glob. I was amazed at how the growth rate and strength improved as there was improvement in growth when I changed from soil to hydro growing and when they were grown under fluoro lights got better .
A shelve setup can be used if your short on floor space, shelves about 30cm. wide and a bit longer that the root chamber are placed on a wall or something. Fluorescent lights are hung on chains and hooks, as the plants grow they are trained horizontally along the tubes. They will need 3 or 4 tubes to get enough light. The plants should be tipped when they reach the end of the fluoro's and if healthy they can be headed. A single PVC tube would be used for the root chamber.
This setup is also good for propagation or starting seedlings, if you already have a grow room on head timing (12h. dark 12h. light). You can have your next crop 2 or 3 weeks old when this ones ready
This diagram show a closet growing set
up, this is a complete set up
 |
1 Root chamber & medium. 2 Tanks aprox 40L. 1 Pump. 1 Timer. 1 Exhaust fan 10'' min 5 hose fittings. 1 4L/hour Dripper per plant. Dripper tube & Supply tube Lights If set up as a flood and drain system the pump output is connected to the top end of the root chamber |
|
The drain tank and pump are placed with the cloning chamber and fluorescent lights in the lower part of the closet if the clone lights have a separate Timer or are on 24 hours then the cloning chamber must light sealed. |
Mixing the two part hydro juice. Half fill the nutrient tank, mix the required amount of concentrate Part A in the water. Fill the tank and mix required amount of concentrate Part B. Check the instructions on the containers before buying or using either type of nutrient concentrate.
List of the 16 elements all plants need
to grow and concentrations in solution.
NAME ELEMENT PPM Nitrogen N 96 Phosphorous P 48 Potassium K 246 Calcium Ca 123 Magnesium Mg 48 Sulfate SO 412 Iron Fe 3 Manganese Mn 0.5 Zinc Zn 0.08 Copper Cu 0.06 Boron B 0.5 Molybdenum Mo 0.1
I have only used per mixed
nutrient solution and am yet to try the formulation
below.
The 16 elements in the table above are derived by plants from the atmosphere or from minerals in the soil, Dr. Alan Cooper proposed this formulation for his NFT hydroponic system, a typical nutrient solution.
The table below contains the ingredients to be added to 1000 liters of water, in practice the solution is concentrated in to 2 parts, preventing loses from chemical reactions. Fill two 10 liter plastic bottles with water mark that part "A" and part "B". Dissolve calcium nitrate and EDTA iron in part "A" and the rest of the ingredients in part "B".
Concentrates are used by adding
100mls.(cc's.) of each part per 10 liters of water. The concentration of the
final solution can be measured with a EC meter (electrical conductivity meter),
this reads the conductivity of the nutrient solution.
Nutrient Chemicals Weight in grams Potassium dihydrogen phosphate 263.00 Potassium nitrate 583.00 Calcium nitrate 1003.00 Magnesium sulphate 513.00 EDTA iron 79.00 Manganous sulphate 6.10 Boric acid 1.70 Copper sulphate 0.39 Ammonium molybdate 0.37 Zinc sulphate 0.44
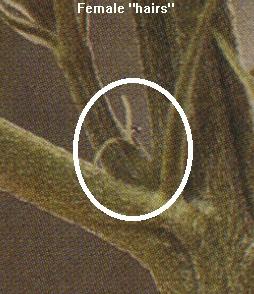
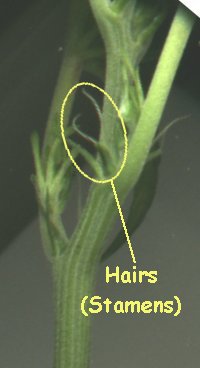 Females The pictures show the first sign that a plant is
turning female, the hairs are a translucent white and usually appear in pairs
from small groth either side of the divisions in the stem, usually in the new
groth (near the tips), then the hairs start to grow in the all the centers,
sometimes the hairs appear in the centers first. When the plant matures there
will be many curly hairs on the heads, colored from off white to orange to
brown.
Females The pictures show the first sign that a plant is
turning female, the hairs are a translucent white and usually appear in pairs
from small groth either side of the divisions in the stem, usually in the new
groth (near the tips), then the hairs start to grow in the all the centers,
sometimes the hairs appear in the centers first. When the plant matures there
will be many curly hairs on the heads, colored from off white to orange to
brown. 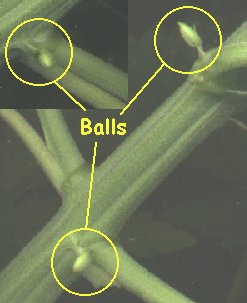 Males
start with a small groth/s in the sameplace as the female but groths are closer
to the stem division and appear more as clusters or bunches growing into small
ball then they burst speading a fine pollen .
Males
start with a small groth/s in the sameplace as the female but groths are closer
to the stem division and appear more as clusters or bunches growing into small
ball then they burst speading a fine pollen .
The Males should be removed
before they burst. Males can appear to be unsexed but have a single branch or
tip sexually mature especially if its in direct contact with a female.
The male balls shown on the right are on the stem where the 3rd. and 4th
braches from the bottom of the plant and did not grow from clusters in new groth
as described above, but this is what they look like anyway or bunches of them
things, they go a lighter green before they burst it only takes a day or
two.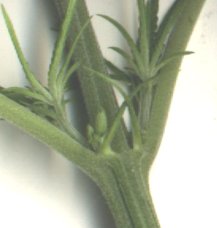

Information provided in this site is deemed reliable but and should be independently verified.
|
|
PROMOTING CONSCIOUSNESS ON THE INTERNET
![]()
 WebMaster
HYDROPONIC NATIONAL DEFENCE BUSINESS PERPETUAL SOLAR POWER FAVORITES LINKS
![]()
Major redesign
and new functionality still under heavy development,
it's a huge undertake